Your south america travel packing list needs to handle cold mornings, hot afternoons, long bus rides, and flights where your bag may vanish for a day. These 7 practical categories cover documents, health, clothing, hygiene, footwear, transit, and space-saving, and they work for changing climates without asking you to haul more than a carry-on or backpack.
The mistake that trips people up is packing for one forecast instead of constant shifts in altitude and transit. A soft black half-zip, quick-dry layers, and backup papers tucked into different pockets beat a heavy suitcase full of single-use items. The details below are the ones that keep a trip moving when the light changes, the air cools, and plans move fast.
1. Protect Documents With Backup Copies
Losing your passport can wreck days of a trip. One paper copy, kept away from the original, gives you a faster path when you need to prove who you are.
Split your backups
- Pack your passport backup copies separately from the real passport, so one theft or lost pouch doesn’t take both.
- Carry copies of travel documents you may need at check-in points, border crossings, or hotel desks.
- Leave another photocopy at home with someone you trust, so the details are still reachable if your bag disappears.
A slim paper copy slides into a flat inner pocket or notebook sleeve. Keep the original dry and easy to reach, but not flashing out every time you stop.
Wearing a Neck Wallet for Travel under your shirt keeps your passport and backup paper copies hidden yet instantly accessible during transit.
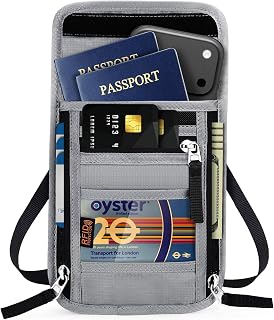

Photo by Mikhail Nilov on Pexels
2. Pack Medication and Health Basics
A small clear pouch with labeled tablets beats a loose handful at the bottom of your bag. Border checks, overnight buses, and delayed flights go more smoothly when your regular doses stay close.
Keep daily needs on you
Bring enough regular medication for the full trip, and keep the most important doses in your personal item, not checked luggage. Original labeled packaging helps if someone asks what you’re carrying. It also cuts confusion when you cross from one stop to the next and the day starts early or ends late.
Skip the extra pile of just-in-case supplies. Pack the medicines and small health items you already use, keep them together, and make sure you can reach them without unpacking your whole bag in a cramped seat, dim airport light, or hostel room.

Photo by Yaroslav Shuraev on Pexels
3. Build a Layerable Clothing Capsule
Start with layers that can handle a cold morning and a warm afternoon on the same day. That one choice saves space better than packing separate outfits for every stop.
A useful core looks simple: T-shirts, base-layer leggings, underwear, socks, a sports bra, and a half-zip layer. Pick pieces that dry fast and feel light against the skin, not thick cotton that stays damp. A charcoal or black half-zip hides wear, and smooth technical fabric folds down smaller than bulky knits.
- Base layers: leggings and tees give you warmth without bulk on high-altitude or overnight travel days.
- Warm-weather add-ons: shorts and vests cover hotter stops without changing your whole bag.
Keep the colors easy to mix so you can rewear pieces without looking thrown together. If one item can’t work in at least two settings, leave it behind.

Photo by Los Muertos Crew on Pexels
4. Choose Versatile Transit-Ready Footwear
Many travelers pack too many shoes, then lose half their bag space before the trip really starts. A better plan is two pairs that cover uneven streets, dusty roads, hostel floors, and long transfer days.
Walking shoes first
Your main pair should be supportive walking shoes with grip for uneven streets, worn steps, and long transfer days. They do not need to look rugged, but they should stay stable on cracked sidewalks, bus station ramps, and slick patches after rain. Closed shoes also help on chilly evenings and dusty roads.
Light sandals second
Then add sandals or flip-flops for hot weather, hostel showers, and quick runs downstairs. A simple pair dries fast, handles wet bathroom floors, and takes almost no room beside rolled clothes. Keep the bulkier pair on your feet in transit, and let the lighter pair ride in the bag where they will not fight for space.
This setup stays practical across climates and works well when one day includes a sidewalk walk, a dusty ride, and a hostel check-in with wet shared floors.
Slips like a pair of Quick Drying EVA Bathroom Slides handle wet hostel floors easily and fold flat to save room in your pack.


Photo by Jonathan Santiago on Pexels
5. Decant Toiletries and Oral Care
Full-size bottles feel like the simple choice, but they add weight and take over a small bag. A better move is to pour your basics into smaller containers before you leave, so your kit stays neat from the first flight to the last bus ride.
Keep travel-size toiletries simple and measured. A smart starting point is 2 ounces each of shampoo, conditioner, body lotion, and face wash, plus 1 ounce of face lotion. Those amounts cover daily use without filling half your bag. Choose leak-resistant bottles and keep them in one clear pouch, so security checks and hostel bathrooms feel less stressful.
Oral care belongs in the same routine. Pack a toothbrush, toothpaste, and floss, then place them where you can grab them at night without unpacking everything. That small setup helps when you arrive late, feel worn out, and still want a clean reset before bed.
Squeezing your shampoo into a humangear GoToob+ 3-Pack prevents messy leaks across your clothes when air pressure shifts.


Photo by Timur Weber on Pexels
6. Prepare a First-Day Transit Pouch
You land after midnight, your bus is delayed, or your backpack is buried under three other bags. In that moment, the items within reach matter most. A small transit pouch gives you what you need for the first stretch without opening your whole bag.
What to Keep Close
- Use one pouch only: keep the same small pouch for transit days so you always know where it is by touch and by habit.
- Pack by sequence: put the first things you will need near the top, and tuck less urgent items behind them.
- Reset it each evening: after arrival, return borrowed items to the pouch so it is ready for the next early checkout or transfer.
- Check it before moving on: zip it, place it back in the same pocket, and confirm it is there before you leave the room, bus, or airport seat.
Keep this pouch under the seat, not in the overhead bin or deep in your pack. A soft zip pouch works well because it bends around other gear and opens fast in tight spaces.
Pack it the night before each travel day. That quick reset matters when plans change, your luggage is out of reach for a few hours, or you arrive tired and need the same system to work again.

Photo by Timur Weber on Pexels
7. Select a Space-Saving Packing Method
Which folding method actually saves space? Test it before departure, not on your first hostel bed. Ranger rolling holds small items tightly, and standard rolling keeps T-shirts easy to see.
Pick One and Stick With It
KonMari folding works well for drawers or cube-style packing because each piece stands upright. Traditional folding can suit bulkier layers that crease less neatly when rolled. Try your clothes capsule with each method, then choose the one that stays compact and easy to repack between stops. Using one system for the whole trip saves time when you’re packing early in the morning or catching a late bus.
Packing your rolled outfits inside a Compression Packing Cubes squeezes out extra air and keeps your bag organized.


Photo by Timur Weber on Pexels
Where to Start Tonight
A first-day transit pouch often fixes the most frustrating travel problems before they grow. It helps when a flight runs late, a bus ride stretches longer than planned, or your main bag takes time to reach you. That small pouch also keeps your routine steady, which matters after a long day at high altitude or in heavy heat.
Use that idea as your starting point for the full south america travel packing list. Tonight, set out one small zip pouch and pack four things into it: your passport copy, regular medication, a clean base layer, and a toothbrush with toothpaste. Once that pouch is done, the rest of your bag gets easier to build.
Read next: 7 South America Travel Essentials for First Trips


